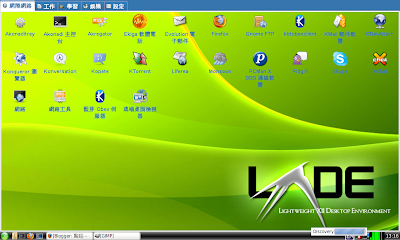
您可以看見右下角的 netstat plugin 已經開始運作
按下 netstat 的圖示會顯示可用的無線網路
點選就可以連上
您也順便會看到 lxlauncher 畫面多了很多的應用程式(在別的分頁還有更多)
因為一開始安裝時選擇 xfce 桌面
昨晚又裝上了 KDE4 和 gnome
閒話不說了
據我的理解猜測加詢問
lxnm 要在系統啟動時就以 daemon 啟動
再用 lxpanel 的 netstat plugin 來控制
在編譯 lxpanel 時需要有 wireless-tools 才會編譯這部份
(順便說一下 volumealsa plugin 需要有 alsa-devel 才會編譯)
(不知道可不可以改成都編譯,再由執行階段決定要啟動哪一個?)
所以我在打包 lxnm 套件時加了一個 /etc/init.d/lxnmd
(這是到處抄來的,有錯請指正)
#!/bin/sh
#
# /etc/init.d/lxnmd
#
### BEGIN INIT INFO
# Provides:            lxnmd
# Required-Start:
# X-UnitedLinux-Should-Start:
# Required-Stop:
# X-UnitedLinux-Should-Stop:
# Default-Start:        3 5
# Default-Stop:            0 1 2 6
# Short-Description:        lxnmd is a network daemon for LXDE
# Description:            lxnmd is a network deamon for LXDE
### END INIT INFO

LXNM_BIN=/usr/sbin/lxnm
test -x $LXNM_BIN || exit 5

# Shell functions sourced from /etc/rc.status:
#      rc_check         check and set local and overall rc status
#      rc_status        check and set local and overall rc status
#      rc_status -v     ditto but be verbose in local rc status
#      rc_status -v -r  ditto and clear the local rc status
#      rc_failed        set local and overall rc status to failed
#      rc_failed <num>  set local and overall rc status to <num><num>
#      rc_reset         clear local rc status (overall remains)
#      rc_exit          exit appropriate to overall rc status
. /etc/rc.status

rc_reset

# Return values acc. to LSB for all commands but status:
# 0 - success
# 1 - generic or unspecified error
# 2 - invalid or excess argument(s)
# 3 - unimplemented feature (e.g. "reload")
# 4 - insufficient privilege
# 5 - program is not installed
# 6 - program is not configured
# 7 - program is not running
#
# Note that starting an already running service, stopping
# or restarting a not-running service as well as the restart
# with force-reload (in case signalling is not supported) are
# considered a success.

case "$1" in
start)
echo -n "Starting LXNM daemon"
startproc -f $LXNM_BIN
rc_status -v
;;
stop)
echo -n "Stoping LXNM daemon"
killproc $LXNM_BIN
rc_status -v
;;
status)
checkproc $LXNM_BIN
rc_status -v
;;
restart)
$0 stop &&  $0 start
rc_status
;;
*)
echo "Usage: $0 {start|stop|restart|status}"
exit 1
;;
esac

rc_exit
若要執行 lxnm
用 YaST->系統->系統服務(Runlevel) 來啟動它
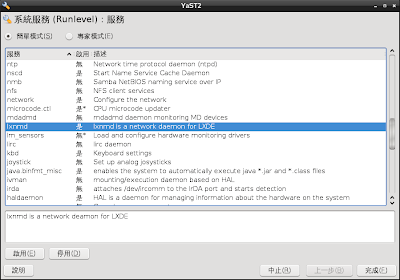
重新開機後就會啟動 lxnm daemon
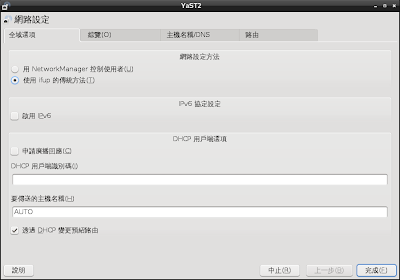
若還是無法連線(要點選可用的無線網路)
試著由 YaST->網路裝置->網路設定 將全域選項分頁中選用 ifup 來控制網路
另,如果您的 lxlauncher 桌面大小顯示不正確,(您可以先用上一篇的方法試試)
且您用 intel 顯示卡
也可能是 videobios 的關係
先看看 /usr/share/doc/packages/915resolution/README.txt
(風險自負)
執行
 # 915resolution -l
Intel 800/900 Series VBIOS Hack : version 0.5.3

Chipset: 855GM
BIOS: TYPE 1
Mode Table Offset: $C0000 + $29f
Mode Table Entries: 39

Mode 30 : 640x480, 8 bits/pixel
Mode 32 : 800x600, 8 bits/pixel
Mode 34 : 1024x768, 8 bits/pixel
Mode 38 : 1280x1024, 8 bits/pixel
Mode 3a : 1600x1200, 8 bits/pixel
Mode 3c : 1920x1440, 8 bits/pixel
Mode 41 : 640x480, 16 bits/pixel
Mode 43 : 800x600, 16 bits/pixel
Mode 45 : 1024x768, 16 bits/pixel
Mode 49 : 1280x1024, 16 bits/pixel
Mode 4b : 1600x1200, 16 bits/pixel
Mode 4d : 1920x1440, 16 bits/pixel
Mode 50 : 640x480, 32 bits/pixel
Mode 52 : 800x600, 32 bits/pixel
Mode 54 : 1024x768, 32 bits/pixel
Mode 58 : 1280x1024, 32 bits/pixel
Mode 5a : 1600x1200, 32 bits/pixel
Mode 5c : 1920x1440, 32 bits/pixel
Mode 7c : 1280x768, 8 bits/pixel
Mode 7d : 1280x768, 16 bits/pixel
Mode 7e : 1280x768, 32 bits/pixel
會列出可能的解析度
選定正確的,記住 Mode 編號和解析度
然後編輯 /etc/sysconfig/videobios 改成
...
VIDEOBIOS_PATCH="yes"
...
VIDEOBIOS_PARAMETERS="7e 1280 768"
這是我的設定別照抄喔!
還有,上一篇說的 lxpanel 修改的圖示無法顯示
是因為 lxde-common 預設使用自己的設定檔而非 lxpanel 的(哇哩勒)
 $ rpm -qf /usr/share/lxpanel/profile/default/panels/panel
lxpanel-0.3.7-7.1
$ rpm -qf /usr/share/lxpanel/profile/LXDE/panels/panel
lxde-common-0.3.2.1-10.1
所以新安裝的 lxde 應該可以顯示正確的變色龍選單和 MozillaFirefox 的圖示了
可惜一波未平一波又起
volumealsa plugin 又不見了(我有看過它啊!是綠色的揚聲器圖示!)
(06/14 23:00)
volumealsa 有圖為證:

這是在更新完 lxpanel 後未登出直接加入
但登出再登入又不見了
(0616)發現是 alsa-plugins-pulse 這個套件有問題,移除後就可以正常顯示 volumealsa
1 則留言:
兄台功课做得好足
SCIM我的解决办法就是不装,还是用FCITX好
張貼留言